In our digital age, high-speed internet and reliable communication networks are powered by fiber optic cables, which transmit data as light signals at incredible speeds. However, the performance of fiber optic technology depends heavily on proper fiber optic cable installation. Whether it’s connecting cities, buildings, or even continents, installing fiber optic cables requires careful planning and execution to ensure optimal performance and durability. Different environments demand different fiber optic cable installation methods: aerial cables strung on poles, direct-buried cables placed underground, submarine cables laid underwater, and indoor or outdoor cables used in specific settings. This beginner-friendly guide will walk you through the step-by-step process of fiber optic cable installation for each method, highlighting best practices, tools, and considerations. Whether you’re a technician, a network planner, or simply curious about fiber optic technology, this article will help you understand how to install fiber optic cables effectively. Let’s get started with this comprehensive guide to fiber optic cable installation!
Understanding Fiber Optic Cable Installation
Fiber optic cable installation is the process of deploying fiber optic cables to create a network for transmitting data as light signals. In fiber optic technology, these cables consist of glass or plastic fibers that carry light pulses, offering high bandwidth, low latency, and immunity to electromagnetic interference. The fiber optic cable installation process involves planning the route, preparing the environment, laying the cable, connecting it to equipment, and testing the network. Different methods of fiber optic cable installation—such as aerial, direct-buried, submarine, indoor, and outdoor—require tailored approaches to account for environmental factors, optical cable types, and performance requirements, ensuring the fiber optic cables function reliably over long distances.
Why Proper Installation Matters in Fiber Optic Technology
Proper fiber optic cable installation is critical to the performance and longevity of a network. In fiber optic technology, even minor errors—like excessive bending, improper splicing, or exposure to moisture—can degrade signal quality, leading to data loss or network downtime. For example, an improperly installed aerial fiber optic cable might sag and break in high winds, while a poorly buried cable could be damaged by digging. Each fiber optic cable installation method addresses specific challenges, such as protecting submarine cables from water pressure or ensuring indoor cables meet fire safety standards. By following best practices in fiber optic cable installation, technicians can ensure reliable, high-speed communication for years to come.
Tools and Safety Precautions for Fiber Optic Cable Installation
Before beginning any fiber optic cable installation, technicians need the right tools and safety measures. Essential tools include cable cutters, strippers, cleavers, fusion splicers, optical time-domain reflectometers (OTDRs) for testing, and protective gear like gloves and safety glasses. In fiber optic technology, working with fiber optic cables involves handling glass fibers, which can splinter and cause injury, so safety precautions are crucial. Technicians must also follow local regulations, such as obtaining permits for digging in direct-buried fiber optic cable installation or ensuring aerial installations meet height requirements. Proper preparation ensures a smooth and safe fiber optic cable installation process, regardless of the method used.
Step-by-Step Guide to Fiber Optic Cable Installation Methods
Aerial Fiber Optic Cable Installation
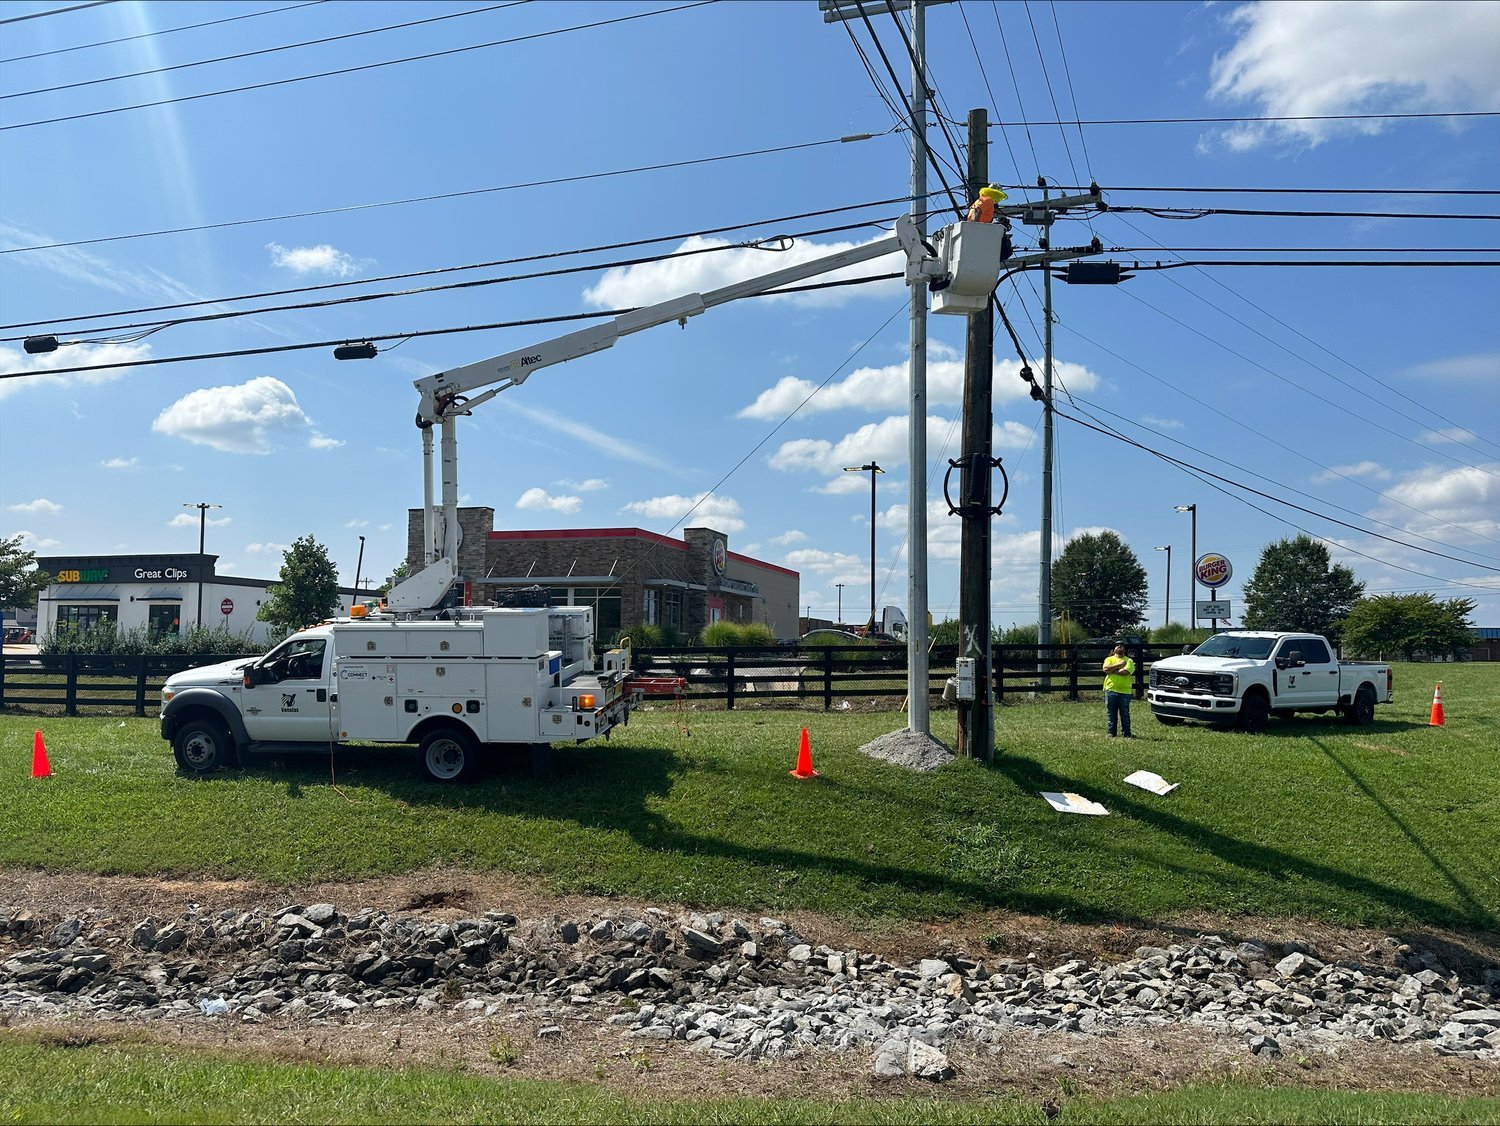
Aerial fiber optic cable installation involves suspending fiber optic cables on poles or towers, commonly used in urban and rural areas for telecommunications networks. Here’s a step-by-step guide:
- Planning and Surveying: Map the route, identifying existing utility poles or planning new ones. Check for obstacles like trees or power lines, and obtain necessary permits for fiber optic cable installation.
- Pole Preparation: Ensure poles are structurally sound and spaced appropriately (typically 30–50 meters apart). Install hardware like brackets or clamps to support the fiber optic cable.
- Cable Preparation: Select an aerial fiber optic cable with a weather-resistant jacket and strength members to withstand wind and ice. Unroll the cable carefully to avoid kinks or damage.
- Stringing the Cable: Use a pulling mechanism, such as a winch, to string the fiber optic cable between poles. Attach the cable to clamps, ensuring proper tension to prevent sagging but avoiding over-tightening, which can stress the fiber optic cable.
- Splicing and Termination: At designated points, splice the fiber optic cable to connect sections or terminate it at a junction box. Use fusion splicing for low signal loss in fiber optic technology.
- Testing: Test the connection using an OTDR to check for signal loss or faults. Ensure the fiber optic cable installation meets performance standards.
- Securing and Maintenance: Secure the fiber optic cable with proper lashing to prevent movement, and schedule regular inspections to address wear from weather conditions.
Aerial fiber optic cable installation is cost-effective for large areas but requires ongoing maintenance to protect the fiber optic cables from environmental factors.
Direct-Buried Fiber Optic Cable Installation
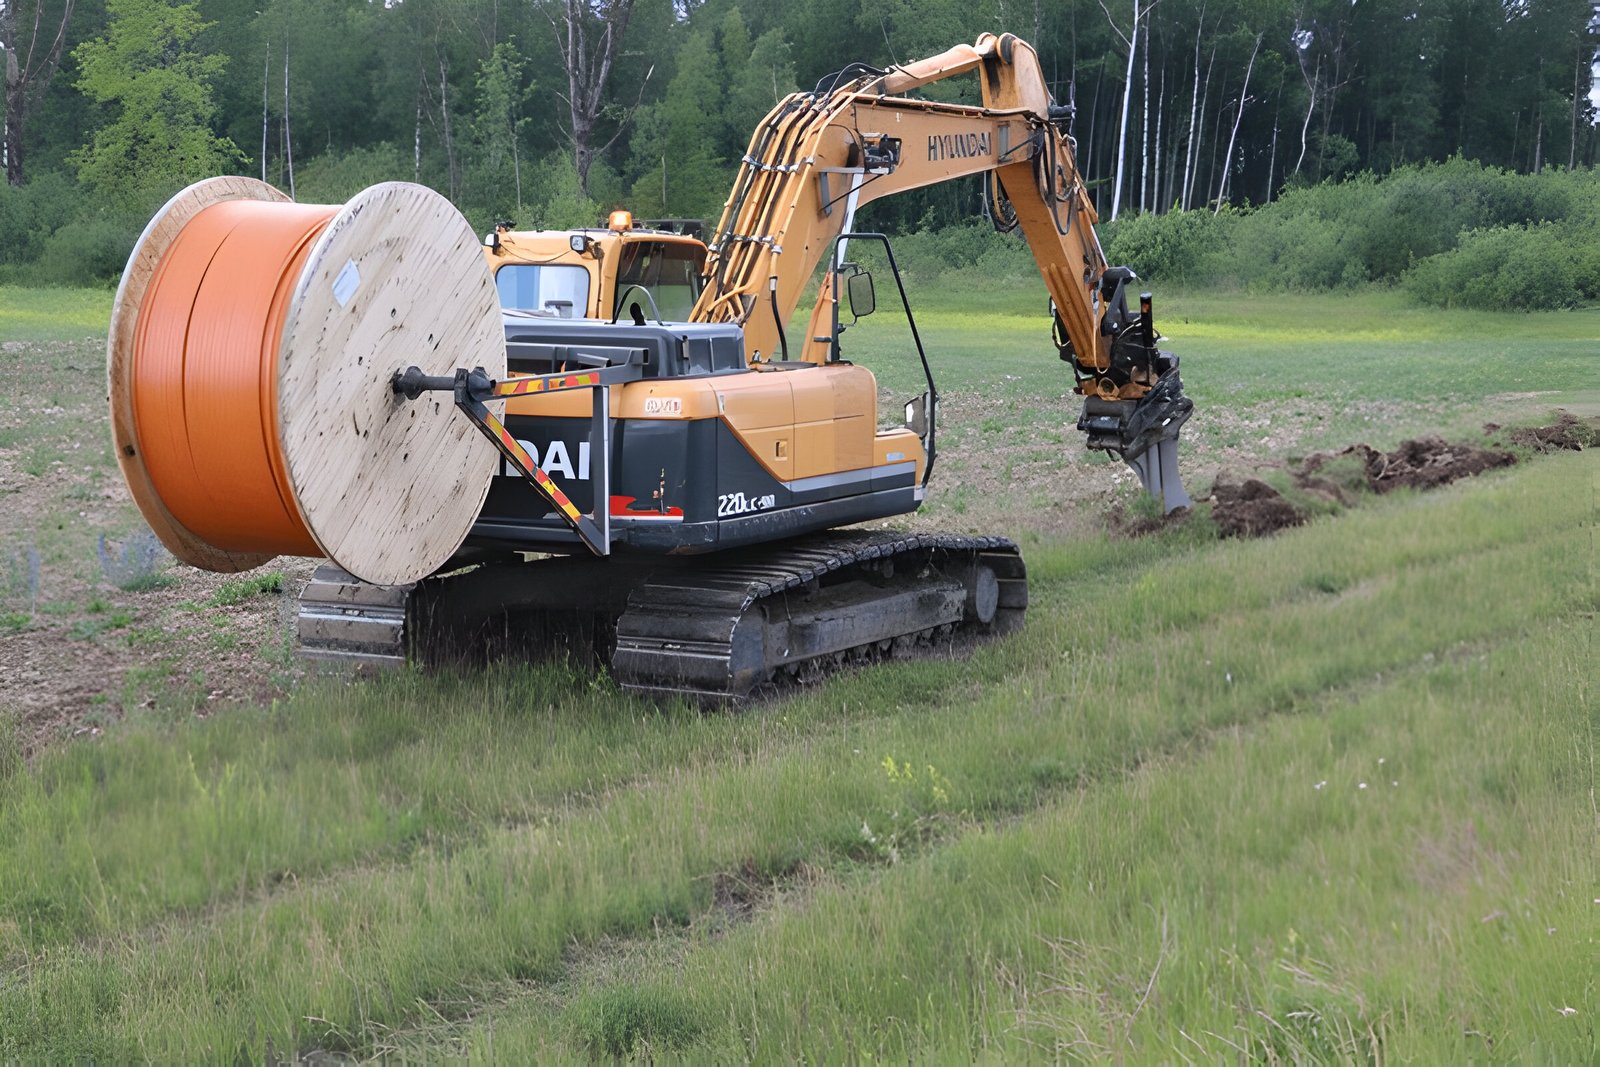
Direct-buried fiber optic cable installation involves placing fiber optic cables directly into the ground without a conduit, often used for long-distance rural networks. Here’s the process:
- Route Planning: Survey the installation path, avoiding obstacles like rocks or existing utilities. Obtain permits for digging and mark underground utilities to prevent damage during fiber optic cable installation.
- Trenching: Dig a trench, typically 0.6–1.2 meters deep, depending on local regulations and soil conditions. Ensure the trench is wide enough to accommodate the fiber optic cable (about 15–30 cm).
- Cable Preparation: Choose a direct-buried fiber optic cable with a rugged, moisture-resistant jacket. Lay the cable flat to avoid twisting or bending beyond its minimum bend radius.
- Laying the Cable: Place the fiber optic cable in the trench, adding a layer of sand or gravel below and above to protect it from sharp objects. Use warning tape above the cable to alert future diggers.
- Backfilling: Fill the trench with soil, compacting it to prevent settling. Avoid large rocks that could damage the fiber optic cable over time.
- Splicing and Termination: Splice the fiber optic cable at connection points or terminate it at access points like manholes, using protective splice closures to shield against moisture.
- Testing and Documentation: Test the fiber optic cable installation with an OTDR to verify signal integrity. Document the route for future reference, noting the depth and location of the fiber optic cables.
Direct-buried fiber optic cable installation is durable but requires careful planning to protect the fiber optic cables from soil movement or accidental digging.
Submarine Fiber Optic Cable Installation

Submarine fiber optic cable installation is used to lay fiber optic cables across oceans or lakes, connecting continents for global communication. Here’s how it’s done:
- Route Planning: Map the underwater route, avoiding hazards like shipwrecks, underwater volcanoes, or fishing zones. Conduct seabed surveys to assess depth and terrain for fiber optic cable installation.
- Cable Selection: Use a submarine fiber optic cable with multiple protective layers, including steel armor and a waterproof jacket, to withstand water pressure, currents, and marine activity.
- Cable Laying Preparation: Load the fiber optic cable onto a specialized cable-laying ship equipped with a plow or remotely operated vehicle (ROV) to guide the cable to the seabed.
- Laying the Cable: Lower the fiber optic cable to the seabed, using the plow to bury it in shallow waters (up to 1000 meters) to protect it from anchors or fishing gear. In deeper waters, the cable may rest on the ocean floor.
- Splicing and Connection: At landing points on shore, splice the submarine fiber optic cable to terrestrial cables, using watertight splice boxes to prevent corrosion in fiber optic technology.
- Testing: Test the entire fiber optic cable installation for signal continuity and loss, ensuring the cable performs over long distances across the ocean.
- Monitoring and Maintenance: Deploy sensors to monitor the fiber optic cable for damage from natural events like earthquakes. Use repair ships to fix faults, which may involve retrieving and splicing the fiber optic cables.
Submarine fiber optic cable installation is complex and costly but essential for global internet connectivity, requiring specialized equipment and expertise.
Indoor Fiber Optic Cable Installation
Indoor fiber optic cable installation is used within buildings, such as offices or data centers, to connect devices or rooms. Here’s the step-by-step process:
- Planning the Route: Map the cable path within the building, using existing cable trays, conduits, or ceiling spaces. Ensure compliance with fire safety codes for fiber optic cable installation.
- Cable Selection: Choose an indoor fiber optic cable with a flame-retardant jacket, such as plenum-rated cable for air-handling spaces, to meet safety standards in fiber optic technology.
- Cable Routing: Run the fiber optic cable through conduits or trays, avoiding sharp bends that exceed the cable’s minimum bend radius (typically 10 times the cable diameter). Secure the cable with ties or clips.
- Splicing and Termination: Terminate the fiber optic cable at patch panels or equipment racks, using connectors like SC or LC. Splice cables if needed, ensuring minimal signal loss.
- Testing: Use an OTDR or light source and power meter to test the fiber optic cable installation, checking for signal loss or faults in the connection.
- Labeling and Documentation: Label the fiber optic cable at both ends for easy identification, and document the installation layout for future maintenance.
- Final Adjustments: Inspect the setup to ensure the fiber optic cables are securely fastened and protected from physical damage within the indoor environment.
Indoor fiber optic cable installation prioritizes safety and accessibility, ensuring the fiber optic cables support high-speed networks within a building.
Outdoor Fiber Optic Cable Installation
Outdoor fiber optic cable installation connects buildings or facilities over larger areas, often in urban or suburban settings, using methods like ducting. Here’s the process:
- Route Planning: Plan the outdoor route, identifying existing ducts or planning new ones. Check for environmental factors like traffic or weather that could affect fiber optic cable installation.
- Duct Preparation: Install or use existing underground ducts, typically made of PVC or HDPE, to protect the fiber optic cable. Ensure ducts are clean and free of debris.
- Cable Selection: Choose an outdoor fiber optic cable with a UV-resistant, waterproof jacket to withstand weather conditions, such as temperature changes or rain, in fiber optic technology.
- Cable Pulling or Blowing: Use a pulling rope or air-blowing technique to feed the fiber optic cable through the duct, ensuring the cable isn’t stretched or bent excessively.
- Splicing and Termination: Splice the fiber optic cable at manholes or junction boxes, and terminate it at outdoor cabinets or buildings, using weatherproof enclosures.
- Testing: Test the fiber optic cable installation with an OTDR to verify signal quality, addressing any issues like signal loss or damage.
- Sealing and Protection: Seal duct entries and splice points to prevent water ingress, and use rodent-resistant materials to protect the fiber optic cables from environmental damage.
Outdoor fiber optic cable installation ensures durability in harsh conditions, providing reliable connectivity over larger areas.
Benefits of Proper Fiber Optic Cable Installation
Reliable High-Speed Connectivity
Proper fiber optic cable installation ensures reliable, high-speed connectivity across all methods. In fiber optic technology, correctly installed fiber optic cables minimize signal loss, delivering consistent performance for applications like internet access, video streaming, and data transfer, whether through aerial, direct-buried, submarine, indoor, or outdoor installations.
Long-Term Durability and Low Maintenance
A well-executed fiber optic cable installation enhances the durability of fiber optic cables, reducing the need for frequent maintenance. For example, a properly buried submarine fiber optic cable can last decades with minimal repairs, while an indoor cable installed with fire safety in mind avoids costly replacements, ensuring long-term reliability in fiber optic technology.
Scalability for Future Needs
Proper fiber optic cable installation allows for scalability, enabling networks to handle future demands. In fiber optic technology, installing extra capacity (e.g., dark fiber) during fiber optic cable installation ensures the network can support increased data traffic, making it a future-proof solution for growing connectivity needs across all installation methods.
Challenges in Fiber Optic Cable Installation
Environmental and Terrain Challenges
Each fiber optic cable installation method faces unique environmental challenges. Aerial fiber optic cables are exposed to wind and ice, direct-buried cables face soil shifts, submarine cables deal with water pressure, and outdoor cables must withstand weather extremes. In fiber optic technology, careful planning and robust cable design are essential to overcome these challenges during fiber optic cable installation.
High Initial Costs and Expertise
Fiber optic cable installation can be costly and requires specialized expertise. Submarine fiber optic cable installation, for instance, involves expensive ships and equipment, while indoor installations require knowledge of fire codes. In fiber optic technology, the need for skilled technicians and advanced tools can make fiber optic cable installation a significant investment, though the long-term benefits often outweigh the costs.
Risk of Damage During Installation
The risk of damaging fiber optic cables during fiber optic cable installation is a common challenge. In fiber optic technology, excessive bending, improper splicing, or exposure to moisture can impair the fiber optic cable’s performance. Each method—whether aerial, direct-buried, submarine, indoor, or outdoor—requires careful handling to prevent damage, ensuring the success of the fiber optic cable installation.
Conclusion: Mastering Fiber Optic Cable Installation
Fiber optic cable installation is a critical process that powers our connected world, enabling high-speed, reliable communication through fiber optic technology. Whether it’s aerial fiber optic cables strung on poles, direct-buried cables placed underground, submarine cables crossing oceans, or indoor and outdoor cables connecting buildings, each fiber optic cable installation method requires a tailored approach to ensure success. By following the step-by-step guides outlined above, technicians can achieve reliable, durable, and scalable networks that meet modern demands. While challenges like environmental factors, costs, and the risk of damage exist, the benefits of proper fiber optic cable installation—such as high-speed connectivity and long-term reliability—make it a worthwhile investment. As fiber optic technology continues to evolve, mastering fiber optic cable installation will remain key to building the networks of the future, ensuring that fiber optic cables keep us connected, no matter the environment.
