Hình ảnh kiểm tra cáp quang như xung chẩn đoán của mạng cáp quang—một quá trình quan trọng đảm bảo dữ liệu chảy liền mạch qua các sợi mỏng hơn sợi tóc người, giống như một kỹ thuật viên điều chỉnh máy chính xác. Trong một thế giới mà cáp quang cung cấp năng lượng cho mọi thứ từ băng thông rộng dân dụng đến lưới viễn thông toàn cầu, kiểm tra sợi quang xác minh hiệu suất và xác định các vấn đề, cho dù đó là cài đặt 20 km mới hay liên kết hiện có đang được xem xét. Hướng dẫn này đi sâu vào tất cả các công cụ, phương pháp và mẹo thực tế, đồng thời lưu ý rằng Mạng lưới giao tiếp cung cấp thiết bị kiểm tra OTDR hàng đầu để thực hiện kiểm tra cáp quang chính xác và hiệu quả, trang bị cho các kỹ thuật viên và kỹ sư để duy trì mạng lưới mạnh mẽ.
Ở trung tâm của nó, kiểm tra cáp quang đánh giá mức độ ánh sáng truyền qua sợi quang, đo mức suy giảm tín hiệu (ví dụ: suy giảm 0,2 dB/km), chất lượng đầu nối (ví dụ: suy giảm chèn <0,3 dB) và tính toàn vẹn của cấu trúc—chìa khóa cho chế độ đơn (ví dụ: G652D) hoặc sợi đa chế độ (ví dụ: OM3). Nó được thực hiện sau khi lắp đặt—ví dụ: xác nhận liên kết 15 km bị mất <6 dB—hoặc trong quá trình bảo trì để phát hiện lỗi như mối nối 0,5 dB ở 8 km, bằng cách sử dụng các công cụ như OTDR hoặc đồng hồ đo công suất để đảm bảo luồng dữ liệu không bị gián đoạn.
Tại sao kiểm tra cáp quang lại quan trọng
Kiểm tra cáp quang là không thể thiếu vì nó đảm bảo trực tiếp độ tin cậy và hiệu suất của mạng. Bỏ qua nó, và một cáp chế độ đơn dài 15 km có thể che giấu mất mát mối nối 1,5 dB ở 10 km—đủ để làm suy giảm tín hiệu 40G, dẫn đến việc mất gói tin trong VPN của công ty. Kiểm tra giúp kiểm soát suy giảm—ví dụ, 0,2 dB/km có nghĩa là 3 dB trên 15 km, phù hợp với ngân sách 17 dB—và đảm bảo các đầu nối không làm giảm cường độ tín hiệu—ví dụ, mất mát 0,4 dB từ SC/APC bẩn có thể làm gián đoạn luồng trực tiếp. Phát hiện sớm thông qua kiểm tra sợi quang tránh tình trạng mất kết nối—hãy tưởng tượng một ngân hàng mất kết nối giữa chừng khi đang giao dịch do đường truyền chưa được kiểm tra.
Hơn thế nữa, kiểm tra cáp quang xuất sắc trong việc phát hiện lỗi. Một OTDR có thể phát hiện ra một điểm đứt cách 4 km trong một đoạn đường dài 12 km—ví dụ, từ một vết cắt xây dựng—hoặc một đường cong 0,2 dB tinh tế ở 8 km từ một sợi cáp bị kẹp, được đánh dấu trước khi nó hỏng hoàn toàn. Tầm nhìn xa này ngăn ngừa thời gian chết tốn kém—ví dụ, sửa lỗi 1 dB tránh được sự cố trung tâm dữ liệu $20.000—giữ cho mạng lưới ổn định và hoạt động.
Các công cụ thiết yếu để kiểm tra cáp quang
Kiểm tra sợi quang dựa vào thiết bị chuyên dụng—sau đây là những gì bạn cần.
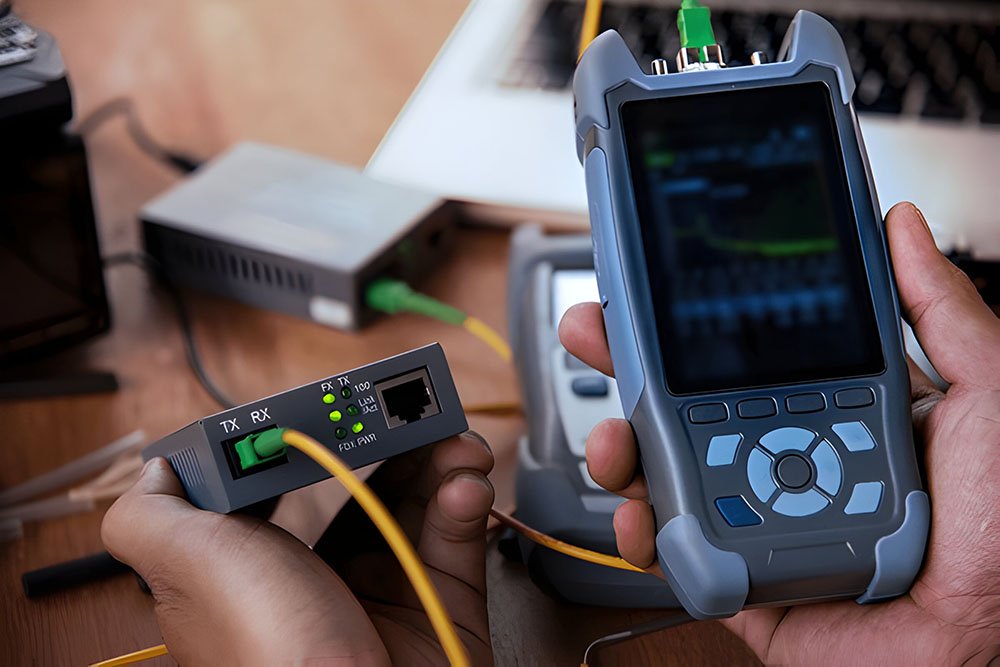
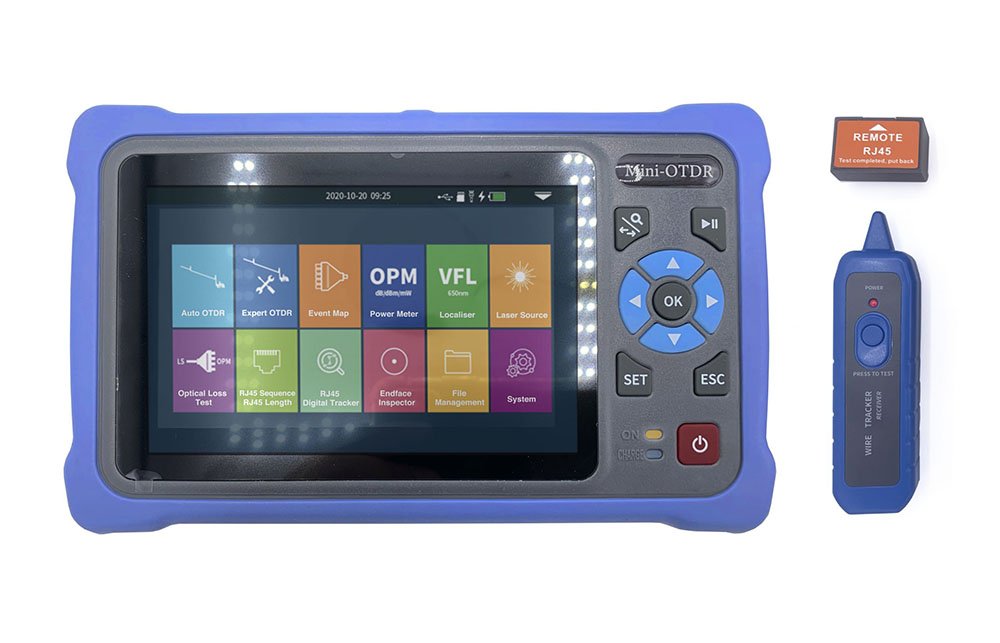
- Máy đo OTDR (Máy đo phản xạ quang học miền thời gian): Nền tảng của kiểm tra cáp quang, OTDR (OTDR) lập bản đồ hiệu suất bằng cách gửi xung ánh sáng và phân tích phản xạ—ví dụ, theo dõi sợi quang dài 30 km để hiển thị 0,2 dB/km, mối nối 0,15 dB ở 12 km và đứt ở 25 km (độ chính xác ±1 m). Dải động 40 dB bao phủ ~200 km ở 0,2 dB/km—lý tưởng để kiểm tra cài đặt hoặc tìm lỗi. CommMesh cung cấp OTDR chất lượng cao—ví dụ, các đơn vị $5000 với dải 45 dB—để kiểm tra chính xác.
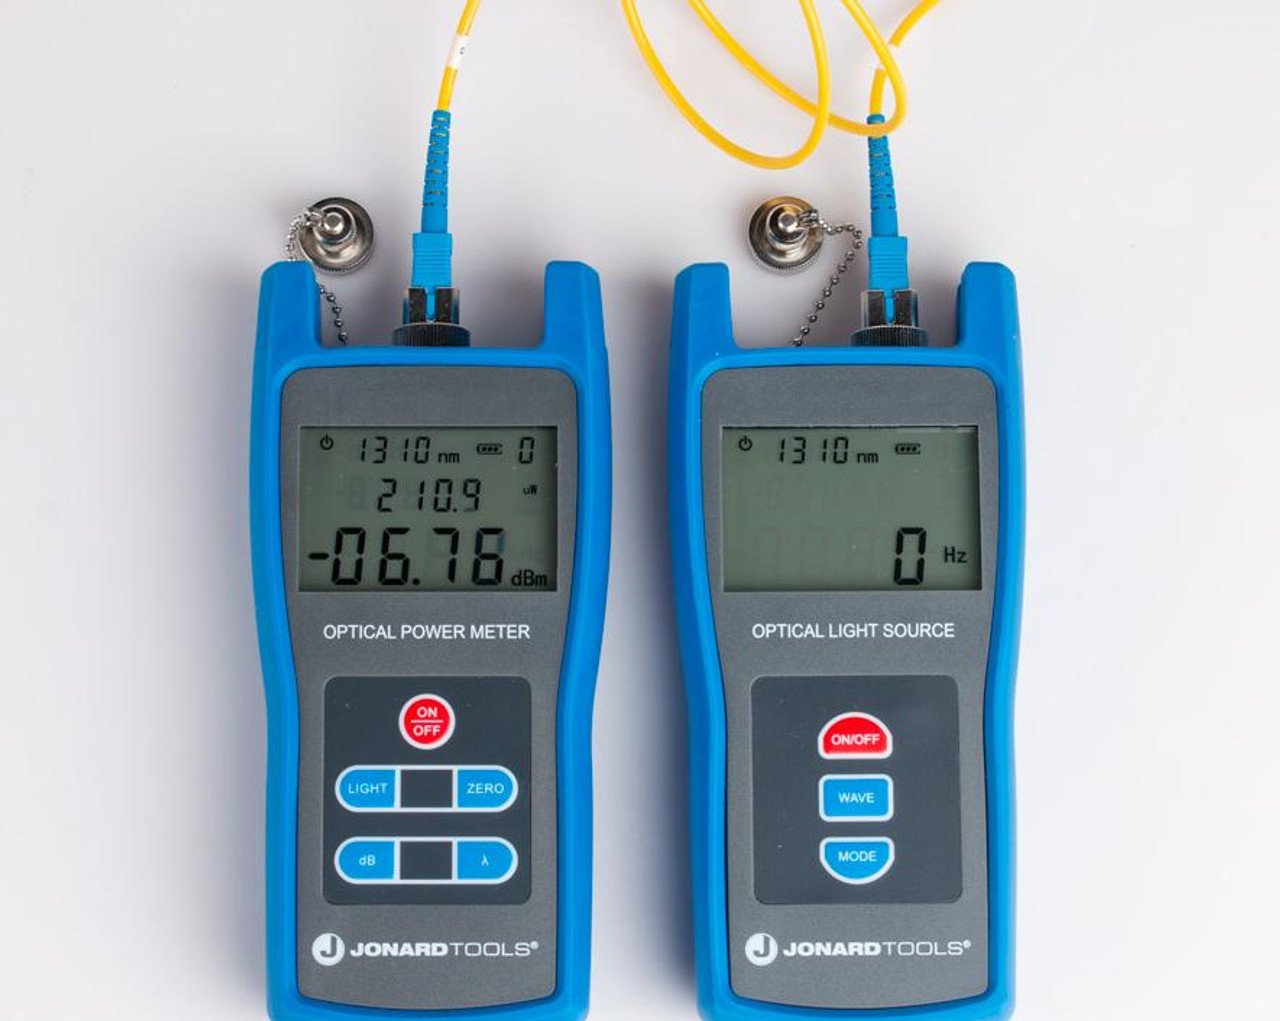
- Máy đo công suất quang và nguồn sáng: Cặp $500 này đo tổng mức suy hao—ví dụ, một nguồn ở -5 dBm (1310 nm) và chỉ số đọc của máy đo -6,5 dBm trên 5 km cho thấy mức suy hao 1,5 dB (0,3 dB/km). Nó nhanh chóng để xác thực các liên kết—ví dụ, một bản vá 1 km bị mất <0,5 dB—hoặc kiểm tra đầu nối—ví dụ, 0,2 dB trên LC đôi.
- Thiết bị định vị lỗi thị giác (VFL): Tia laser đỏ $50 làm nổi bật các lỗi có thể nhìn thấy—ví dụ, vết nứt ở độ cao 100m sẽ phát sáng màu đỏ—hoàn hảo cho việc khắc phục sự cố tầm gần.

Những công cụ này thúc đẩy hiệu quả kiểm tra cáp quang—Máy đo OTDR của CommMesh đảm bảo độ chính xác tuyệt đối.
Phương pháp kiểm tra sợi quang
Kiểm tra cáp quang sử dụng nhiều kỹ thuật khác nhau được thiết kế riêng cho các nhu cầu cụ thể. Kiểm tra đầu cuối với đồng hồ đo công suất và nguồn sáng đo tổng mức suy hao—liên kết 10 km có thể bắt đầu ở mức -5 dBm và kết thúc ở mức -7 dBm, cho thấy mức suy hao 2 dB (0,2 dB/km cộng với đầu nối 0,2 dB), phù hợp với ngân sách 10G là 17 dB. Nhanh chóng—10-15 phút—và phù hợp để xác minh hiệu suất tổng thể sau khi cài đặt—ví dụ: liên kết trung tâm dữ liệu dài 2 km đạt mức suy hao 0,4 dB—hoặc kiểm tra sau khi sửa chữa—ví dụ: đường chạy 5 km đã vá giữ ổn định. Ví dụ: kỹ thuật viên có thể kiểm tra liên kết khuôn viên trường dài 3 km, xác nhận mức suy hao tổng 0,6 dB phù hợp với thông số kỹ thuật—đảm bảo vùng phủ sóng Wi-Fi liền mạch.
Phân khúc theo từng phân khúc kiểm tra sợi quang với OTDR cung cấp cái nhìn sâu sắc hơn, phân tích các phần để xác định vị trí lỗi chính xác. OTDR $6000 quét sợi quang dài 40 km—ví dụ, phát hiện đường cơ sở 0,2 dB/km, mối nối 0,1 dB ở 8 km, uốn cong 0,3 dB ở 20 km và đứt 2 dB ở 35 km—sử dụng xung 10 ns để phát hiện các sự kiện cách nhau 150m. Với cáp khởi chạy dài 500m, mất 20-30 phút—ví dụ, lập bản đồ liên kết nông thôn dài 25 km để tìm mất mối nối 0,15 dB ở 15 km từ một cài đặt vội vàng hoặc lỗi 1 dB ở 22 km từ một nhánh cây đổ, hướng dẫn các bản sửa lỗi có mục tiêu. Cả hai phương pháp đều đảm bảo kiểm tra cáp quang là toàn diện.
Quy trình kiểm tra cáp quang từng bước
Đang chạy kiểm tra cáp quang đòi hỏi một cách tiếp cận có cấu trúc—sau đây là cách thực hiện.
Chuẩn bị cho thử nghiệm sợi quang
- Chuẩn bị dụng cụ: OTDR (ví dụ: từ CommMesh), đồng hồ đo công suất, nguồn sáng, bộ dụng cụ vệ sinh $50.
- Làm sạch đầu nối: Sử dụng khăn lau cồn ($10) và chất tẩy rửa để loại bỏ bụi khỏi đầu SC/APC—ví dụ, tránh mất 0,5 dB do bụi bẩn.
- Hiệu chỉnh: Đặt OTDR ở 1550 nm và đưa về 0; đảm bảo đồng hồ đo công suất đọc chính xác -5 dBm—ví dụ, độ lệch 0,1 dB sẽ làm lệch dữ liệu.
- Kiểm tra: Kiểm tra lõi bằng kính hiển vi $20—ví dụ, một vết xước sẽ làm mất 0,2 dB—mất 15-30 phút cho đường liên kết 20 km.
Tiến hành thử nghiệm cáp quang
- Kết nối: Kết nối một OTDR với cáp phóng dài 1 km vào sợi quang dài 15 km—ví dụ, tránh vùng chết dài 10m.
- Kiểm tra: Quét OTDR cho thấy 0,2 dB/km, mối nối 0,25 dB ở 10 km; đồng hồ đo công suất/nguồn xác nhận tổng suy hao 3 dB—ví dụ, khớp trong phạm vi 0,2 dB.
- Ghi lại: Ghi lại “15 km, 3 dB, 2 mối nối” vào máy tính xách tay hoặc phần mềm OTDR—ví dụ: xuất USB—mất 30-60 phút.
OTDR của CommMesh cải thiện kiểm tra cáp quang—mang lại kết quả rõ ràng, có thể thực hiện được.
Giải thích kết quả thử nghiệm sợi quang
Hiểu biết kiểm tra cáp quang dữ liệu là chìa khóa để hành động. Một dấu vết OTDR của một liên kết 12 km có thể hiển thị 0,2 dB/km—tổng cộng là 2,4 dB—cộng với 0,2 dB cho mỗi đầu nối (hai cặp, 0,4 dB), tổng cộng là 2,8 dB—thấp hơn nhiều so với ngân sách 10G là 17 dB. Một đột biến 1,5 dB ở 6 km đánh dấu một mối nối xấu—ví dụ, các sợi quang không thẳng hàng cần phải nối lại trong 10 phút bằng máy nối $2000—trong khi phản xạ toàn phần ở 10 km chỉ ra một sự đứt gãy—ví dụ, một vết cắt do đào, cần phải thay thế 100m ($40). Kiểm tra công tơ điện—ví dụ, tổng cộng là 2,9 dB—hỗ trợ điều này, nhưng một bất thường 0,6 dB ở 4 km có thể báo hiệu một sự uốn cong—ví dụ, từ một ống dẫn chặt chẽ—để sửa chữa.
Xử lý sự cố dựa trên điều này—ví dụ, giảm 2 dB ở 18 km trên liên kết 25 km (phản xạ toàn phần OTDR) xác định một phần bị đứt hoặc mối nối 0,3 dB ở 5 km được tinh chỉnh thành 0,1 dB—ví dụ, tăng biên độ của liên kết 40G. Trong trường hợp viễn thông, mất 1 dB ở 15 km trên đường chạy 20 km—được theo dõi đến một điểm bị đè bẹp dưới đường—được vá ($50), trong khi lỗi 0,5 dB ở 3 km trên liên kết khuôn viên trường 10 km—ví dụ, từ một mối nối lỏng lẻo—được thắt chặt sau khi điều chỉnh. Kiểm tra sợi quang biến dữ liệu thành bản sửa lỗi.
Những thách thức phổ biến trong thử nghiệm cáp quang
Kiểm tra sợi quang phải đối mặt với những rào cản có thể làm mờ kết quả. Thời tiết ảnh hưởng đến các phép đo—ví dụ, -30°C làm tăng độ suy giảm lên 0,23 dB/km từ 0,2 dB/km ở 20°C, tăng thêm 0,3 dB trên 10 km—trong khi nhiệt độ (45°C) hoặc bụi trên các đầu nối (ví dụ, mất mát 0,3 dB) làm méo dữ liệu—kiểm tra trong nhà hoặc sau khi vệ sinh (lau $10) sẽ giải quyết được vấn đề này. Các đầu bị ướt mưa—ví dụ, mất mát thêm 0,6 dB—cần phải sấy khô và kiểm tra lại.
Giới hạn thiết bị cũng kiểm tra kiểm tra cáp quang. Một OTDR $2000 (phạm vi 35 dB) mờ dần sau 150 km—ví dụ, nhiễu che giấu mối nối 0,15 dB ở 160 km—trong khi vùng chết 15m che giấu lỗi gần đầu—ví dụ, mất kết nối 0,2 dB ở 10m. Đồng hồ đo công suất trôi—ví dụ, mất 0,1 dB sau sáu tháng—cần hiệu chuẩn lại $50. Cáp khởi chạy 1 km hoặc OTDR cao cấp (ví dụ, $8000, phạm vi 45 dB) khắc phục được những thách thức này.
Thực hành tốt nhất để kiểm tra cáp quang hiệu quả
Thành công trong kiểm tra sợi quang dựa vào các thói quen thông minh. Kiểm tra trước, đảm bảo sự sẵn sàng—làm sạch các đầu nối bằng bộ dụng cụ $50 (ví dụ, một vết bẩn làm tăng thêm 0,3 dB mất mát), sạc OTDR (pin $50, 8 giờ) và khớp các bước sóng—ví dụ, 1310 nm cho liên kết 10G. Kiểm tra một bản vá 2 km đã biết—ví dụ, mất 0,4 dB—để xác nhận thiết bị, tránh đọc sai 10 km (ví dụ, mất 0,5 dB từ pin chết)—chuẩn bị mất 15-20 phút.
Kiểm tra sau, xác minh các phát hiện—chạy lại OTDR trên liên kết 25 km (ví dụ, mất 5 dB) và kiểm tra chéo với máy đo công suất (5,2 dB)—khoảng cách 0,2 dB là bình thường. Các thông số cụ thể của nhật ký—ví dụ, “25 km, 5 dB, 4 mối nối, 1550 nm”—và lưu dấu vết (ví dụ, xuất USB OTDR)—bắt được mối nối 0,25 dB bị bỏ sót giúp tiết kiệm việc làm lại. Kiểm tra cáp quang đòi hỏi sự siêng năng để đạt được kết quả cao nhất.
Kết luận: Làm chủ thử nghiệm cáp quang
Kiểm tra cáp quang là đường dây cứu sinh của mạng cáp quang, đảm bảo tín hiệu truyền đi hoàn hảo—giống như la bàn điều hướng dữ liệu qua cơn bão. Hướng dẫn này đã đề cập đến tất cả—những gì kiểm tra sợi quang đòi hỏi, các công cụ và phương pháp của nó. Từ một bản vá 1 km đến xương sống 60 km, kiểm tra cáp quang với thiết bị phù hợp sẽ giữ cho mạng của bạn mạnh mẽ. Master kiểm tra cáp quang với OTDR của CommMesh ngay hôm nay và xây dựng kết nối lâu dài!
